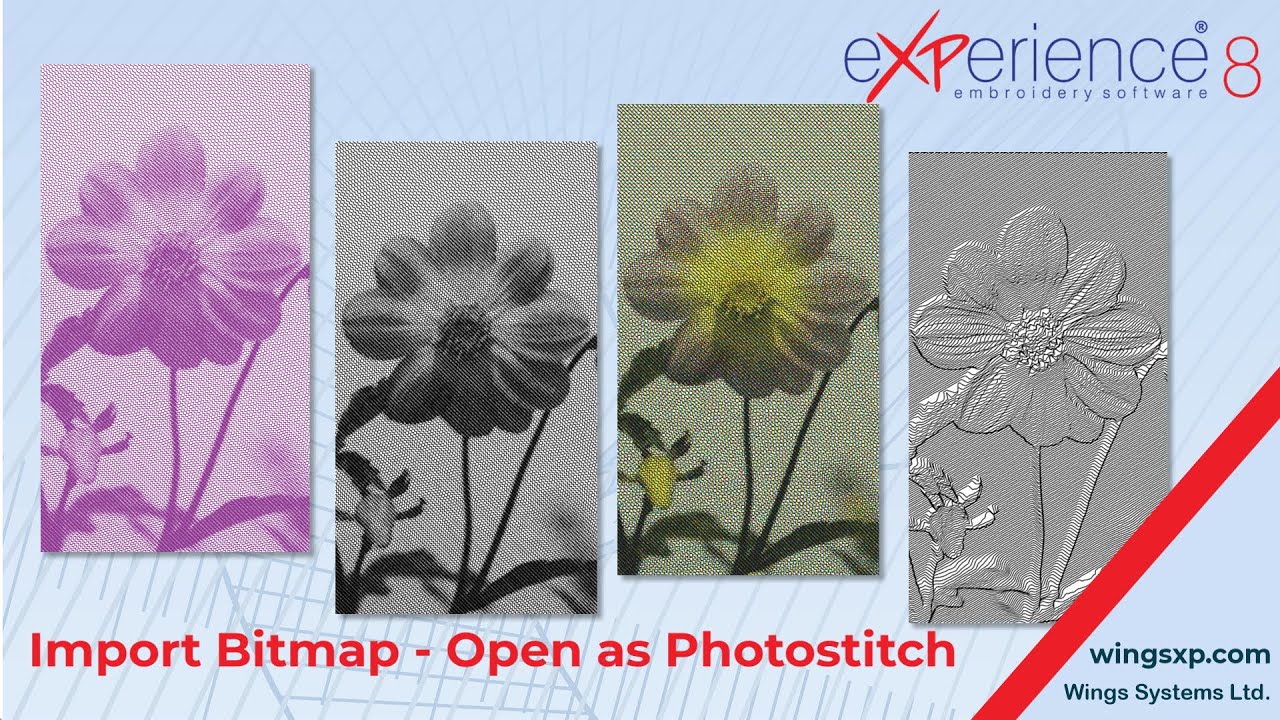
How to Convert Bitmap Images to PhotoStitch Designs
This guide explains how to import bitmap images and convert them into professional PhotoStitch embroidery designs using eXPerience 8. The software analyzes the image and creates layers of satin bars that follow the color gradients of the original image.
Step 1: Import the Image
- Click the From file icon to locate the image you wish to import.
- Select the desired bitmap image and open it.
- A dialog will appear showing handling options; select Open as PhotoStitch to proceed.
Step 2: Select and Resize
Before finalizing the import, you can adjust the specific area of the image you want to digitize.
- Crop the Image: Use the handles on the outer edge of the image preview to select a specific portion. Alternatively, click and drag directly on top of the preview to create a new selection.
- Note: To reset your selection, click the circle icon.
- Adjust Resolution: In the lower part of the dialog, you can change the Width, Height, or dpi values.
- Changing one value automatically updates the others to keep the image resized proportionally.
- If you selected a specific portion of the image (crop), only that portion is resized.
Useful Tip: The default “backdrop size limit” is 29.5cm (11.6 inches). If your image dimensions exceed this, the software will automatically adjust the resolution values to match this limit. It is recommended to scale the image down to a size that fits your specific hoop.
Step 3: Choose Color Mode (Monochrome vs. Color)
Once the image is imported, it is automatically converted into a PhotoStitch design. You can choose between two main modes:
Option A: Monochrome (Default)
- By default, designs are created in Monochrome.
- Negative: Enable the Negative option to reverse the fill area, making light areas appear dark and vice versa.
- Color Selection: You can turn a monochrome design into any color by editing the color on the Used Colors bar.
Option B: 4-Color (CMYK)
- Disable the Monochrome option to create a 4-color design.
- The software creates four layers of colored satin bars (Cyan, Magenta, Yellow, and Black) to mimic the image gradients.
- Note: In this mode, you cannot manually change the specific colors used.
Step 4: Adjust PhotoStitch Properties
To fine-tune the look of the embroidery, access the Properties menu.
- Satin Width: Adjusts the width of the satin bars.
- Lower values: Create more stitches and a result that looks more like the initial image.
- Higher values: Create fewer stitches, but the result may look distorted or less accurate.
- Density: Changes the density of the satin bars.
- Gamma: Typing a Gamma value can enhance the result depending on the image used.
Step 5: Apply Textured Styles (Monochrome Only)
When working in Monochrome, you can select specific styles from the Properties bar to change the texture of the design.
Height Style This converts the design into parallel Satin bars.
- Height Parameter: Controls distortion strength. Ranges from 0.1 (subtle) to 6 (maximum depth).
- Width Parameter: Sets the distance between the satin bars. A minimum value of 1 creates a fuller, more readable design.
- Note: If you check the Negative option here, the elevation effect inverts perception.
Grid Style Enabling this adds both horizontal and vertical satin bars, creating a unique embroidery texture.
- You can adjust the Height and set a desired Width value just as you would in Height Style.
Alternative Artistic Conversions
The imported bitmap does not have to be a PhotoStitch. The software allows for other conversions including:
- Cross-stitch designs.
- PaintStitch: A patented tool that makes the design look like a brush painting.
- Charcoal Sketch: Another patented tool for a sketch aesthetic.
eXPerience Facebook Page
Happy crafting and don’t forget to share your creations with us in the
eXPerience Facebook Page!