How to Insert and Customize Ready-Made Shapes in eXPerience 8
This guide will walk you through the process of inserting and customizing the ready-made shapes available in your eXPerience 8 embroidery software.
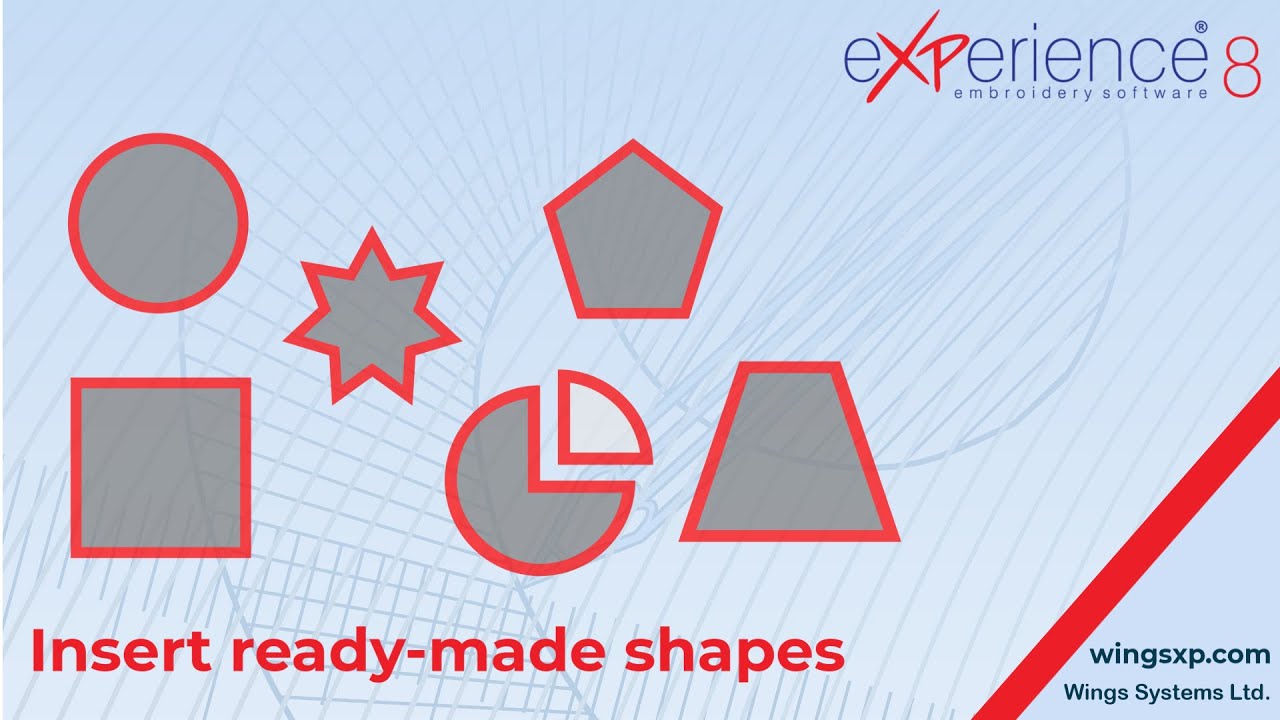
1. Locating and Inserting Shapes
You can easily create perfect shapes like ellipses, rectangles, and stars using the built-in shape tools.
Steps:
- Navigate to the “Shapes” section on the main toolbar. You will see an icon for the last-used shape.
- To select a different shape, hover your mouse over the “Shapes” icon. A flyout menu will appear, displaying all available options: Ellipse, Pie, Rectangle, Trapezoid/Parallelogram, Polygon, Star, and QR Code.
- Click on the shape you wish to use. The selected shape tool is now active and its icon will be visible on the toolbar for quick reuse.
- On the design canvas, click and drag your mouse to set the position and size of the shape. A live preview will be visible as you drag.
- Release the mouse button to finalize the shape. The tool will remain active, allowing you to insert multiple instances of the same shape.
- Once you are finished, right-click on the canvas or click the “Rectangle Selection” tool to deactivate the shape tool.
2. Customizing Shape Properties
You have the flexibility to adjust shape properties both before and after you place them on the canvas.
Before Placement:
- Before you click and drag to create a shape, you can pre-define its specific options in the “Tools Options” bar that appears.
- Example: When using the Pie shape, you can set the Start and Stop angles before drawing it.
After Placement:
- You can also select and modify a shape after it has been placed on the design area.
3. Applying and Changing Stitch Types
The software automatically applies the last-used stitch type to any new shape you create. However, you can easily change this.
To change the stitch type after creating a shape:
- Select the shape on the canvas.
- Choose a new stitch type from the available options.
To pre-select a stitch type before creating a shape:
- Select a stitch type first (e.g., Step Fill).
- Choose your desired shape tool (e.g., Polygon).
- Create the shape. If required by the stitch type, you may need to define additional parameters, such as the direction of the stitches for a Step Fill.
- Any subsequent shapes you create will continue to use this pre-selected stitch type until you change it.
4. Using Keyboard Keys for Precise Control
Enhance your workflow by using keyboard shortcuts while dragging to create a shape.
- Hold
CTRL: Constrains the shape’s proportions, maintaining an equal width and height. This is perfect for creating a perfect circle or a perfect square. - Hold
SHIFT: Draws the shape from the center outwards, instead of from corner to corner. - Hold
ALT: Temporarily toggles the “Snap to Grid” functionality.- If “Snap to Grid” (found in the View menu) is off, holding
ALTwill temporarily turn it on. - If “Snap to Grid” is on, holding
ALTwill temporarily turn it off.
- If “Snap to Grid” (found in the View menu) is off, holding
You can also combine these keys for greater control.
CTRL+SHIFT: Draw a perfect circle or square starting from its center point.
By following these steps, you can efficiently insert, customize, and control ready-made shapes to create precise and beautiful embroidery designs. For more detailed instructions on each specific shape, please refer to the other videos in this series.
eXPerience Facebook Page
Happy crafting and don’t forget to share your creations with us in the
eXPerience Facebook Page!