How to Use the Monogram Tool in eXPerience 8 Embroidery Software
Reading Time: 2 minutes
The Monogram Tool in eXPerience 8 embroidery software enables you to create personalized monogram designs by combining letters with customizable fonts, layouts, and decorative frames. This step-by-step tutorial will guide you through the process of creating a monogram using this tool.
Step-by-Step Instructions
1. Access the Monogram Tool
- Launch eXPerience 8 Embroidery Software.
- Locate the toolbar on the left side of the application window.
- Identify the Lettering icon in the toolbar.
- Click the Lettering icon or hover over it to display a submenu.
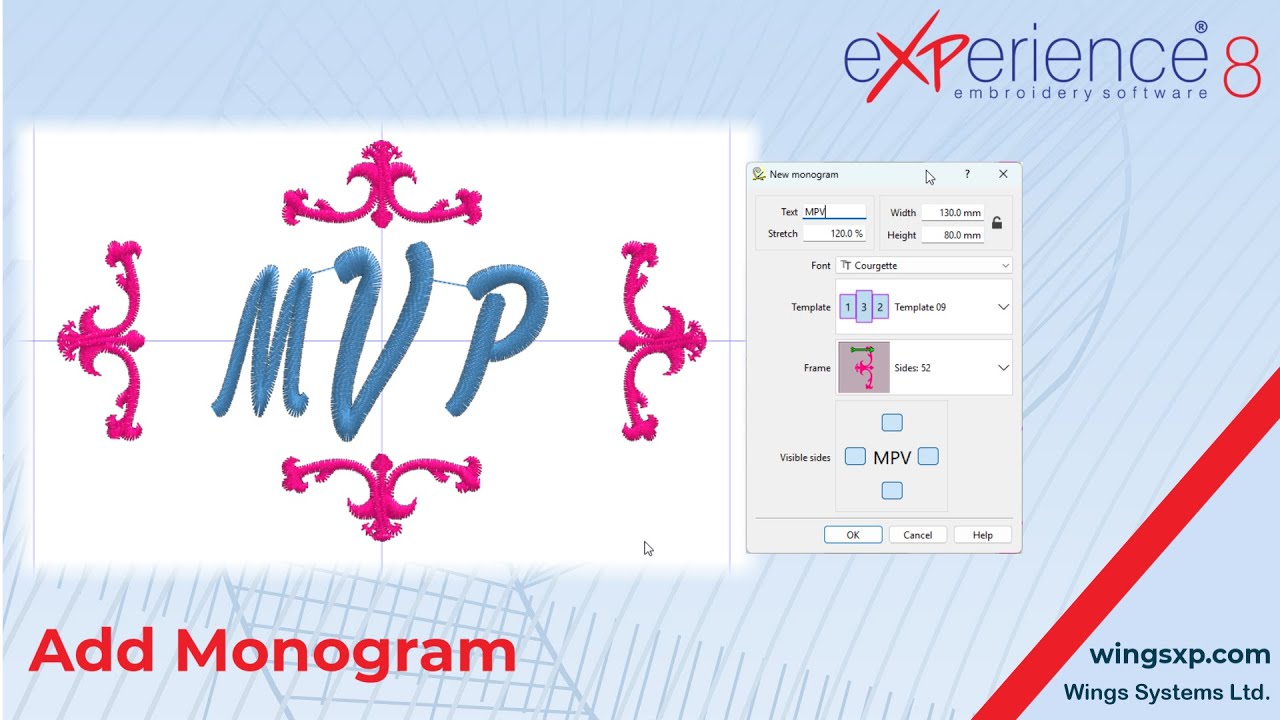
- Select the Monogram tool from the submenu. This opens the Monogram dialog box.
2. Enter Monogram Characters
- In the Monogram dialog box, find the text field for entering characters.
- Type the letters for your monogram (e.g., initials). Monograms typically use two or three letters.
3. Set the Size of the Monogram
- Locate the width and height fields in the dialog box.
- Enter your desired width and height values for the monogram.
- If available, enable the proportional scaling option to ensure the width and height adjust together.
4. Choose a Font
- Find the font dropdown menu in the dialog box.
- Select a font from the list of fonts installed on your computer.
5. Select a Monogram Layout
- Locate the layout dropdown menu.
- Choose a layout option to arrange the letters in your monogram.
- Check the preview to see how the selected layout affects the design.
6. Add a Frame (Optional)
- To include a decorative frame, locate the frame selection options.
- Choose from three main frame types:
- Border: Surrounds the entire monogram.
- Corners: Applies decorative elements to the monogram’s corners.
- Side Frames: Places decorative elements on the monogram’s sides.
- For corner or side frames, specify which corners or sides to apply the frame to.
- Note: Some complex frames may not fit within the current monogram size. If this occurs, increase the monogram’s width and height.
7. Adjust the Stretch (If Needed)
- Find the stretch option in the dialog box.
- Adjust the stretch value to modify the proportion of the monogram within the frame, ensuring optimal letter positioning.
8. Create the Monogram
- When satisfied with your settings, click the OK or Create button (depending on the interface).
- The monogram will be inserted into your embroidery design.
Additional Notes
- The Monogram dialog box retains the settings from your last created monogram, making it easy to reuse or adjust previous designs.
- After creation, you can edit the monogram using the tools option bar or “Edit nodes” mode. Refer to the separate editing tutorial for detailed instructions.
By following these steps, you can create custom monograms in eXPerience 8 Embroidery Software. Experiment with different fonts, layouts, and frames to design the perfect monogram for your embroidery projects.
eXPerience Facebook Page
Happy crafting and don’t forget to share your creations with us in the
eXPerience Facebook Page!