How to Use the Digitizing Tools in eXPerience 8 – Operator Level
This guide provides a step-by-step tutorial on using the core creative features of eXPerience 8 embroidery software: the Digitizing Tools. Learn how to access them, understand their functions, and use them to bring your designs to life.
Part 1: Accessing the Digitizing Tools
The digitizing tools are conveniently located in the “Digitize” section of the main Tools bar.
- Locate the Digitize Section: Find the “Digitize” tools group on the toolbar. The icon of the last tool you used will be visible.
- One-Click Access: If the visible tool is the one you need, simply click it to activate it.
- Select an Alternative Tool: To choose a different tool, hover your mouse cursor over the Digitize section. A fly-out menu will appear, showing all available digitizing tools.
- Activate Your Chosen Tool: Move your cursor over the desired tool in the fly-out menu and click to select it. The tool is now active and its icon will be the new visible icon on the toolbar for easy re-use.
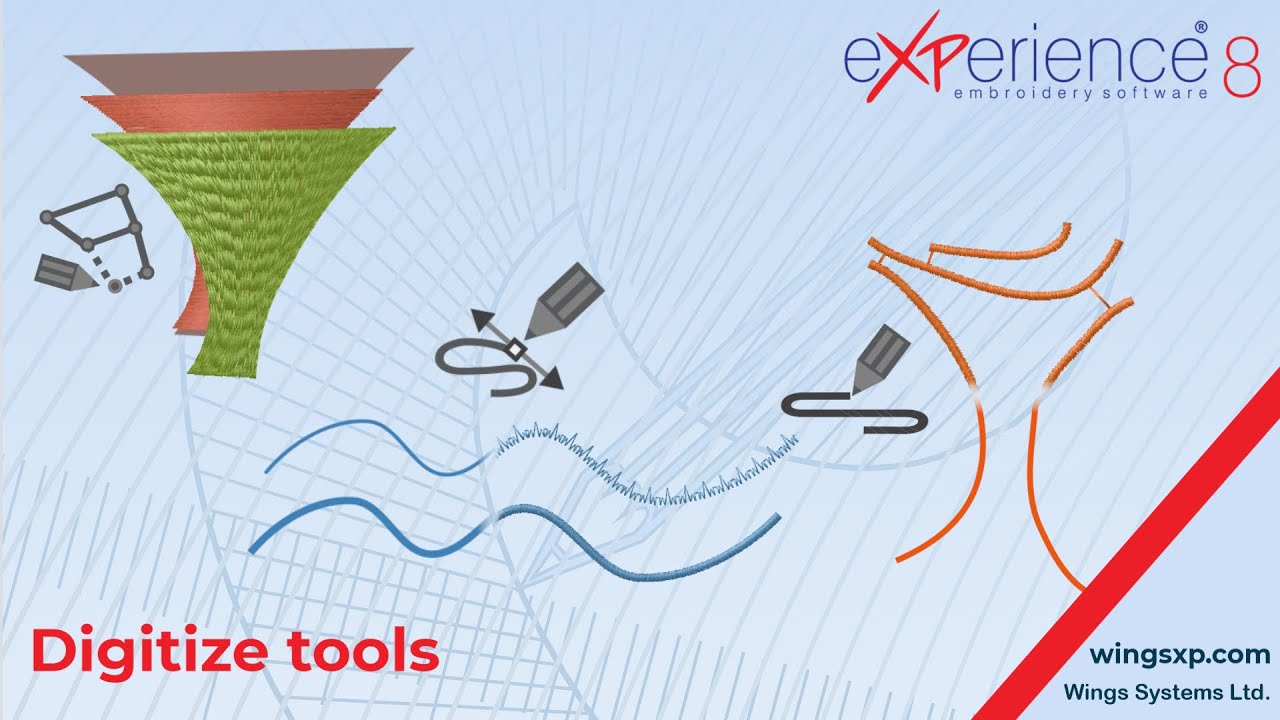
Part 2: Understanding the Core Digitizing Tools
eXPerience 8 offers three primary tools for creating your shapes:
- Outline Digitize: The most versatile tool. Use it to draw any shape by placing nodes. The software will connect these nodes with smooth curves or straight lines. You can create open curves, closed shapes, and even branched objects.
- Pair-point Digitize: A specialized tool designed for creating objects where stitch direction and column width are defined simultaneously. You must place nodes in pairs, where each pair defines the opposite edges of a stitch column.
- Freehand Shapes: This tool allows you to draw shapes organically, as if you were sketching on paper with a pencil.
Useful Tip: The Pair-point Digitize tool is specifically used for Satin and Piping stitch types. It will appear disabled until you select one of these stitch types from the Properties bar. This is because its method of placing points in pairs is essential for defining the stitch direction across the satin/piping column.
Part 3: The Step-by-Step Digitizing Process
Follow this standard workflow to create any new design element.
Step 1: Select a Stitch Type Before you begin drawing, you must tell the software what kind of stitches to fill your shape with.
- Go to the Properties bar and select a stitch type (e.g., Satin, Satin Serial, Step, Piping).
Step 2: (Optional) Select a Color You can pre-select a color for your new object before you place the first point.
- Use the number keys on your keyboard (
1through9) to select the corresponding color from your active color palette. Pressing0will select the tenth color.
Useful Tip: If you select an existing object on your design and then activate a digitizing tool, the new object you create will automatically inherit all the properties (stitch type, color, density, etc.) of the selected object. It will also be placed directly after it in the final stitch sequence.
Step 3: Digitize Your Shape With your tool active and properties set, begin clicking on the design area to place your nodes and create the object’s outline.
- When the shape is complete, right-click to finalize it.
Part 4: Creating Objects with Multiple Sections
Sometimes you may want two separate shapes to be treated as a single object, ensuring they stitch out together with a connecting thread. To do this, you create an object with multiple sections.
- Create Your First Shape: Use a digitizing tool to create the first part of your object.
- Finalize the Section (Not the Object): Instead of right-clicking twice, right-click only once. Alternatively, press Enter or Esc a single time. This finalizes the current section, but keeps the digitizing tool active and ready to add another section to the same object.
- Create Subsequent Shapes: Immediately begin digitizing the next shape.
- Finalize the Entire Object: Once all sections are complete, right-click twice (or press Enter/Esc twice). This ends the object creation process. The sections you created will now be linked as one object.
To release the tool completely, you can right-click one more time or simply click the Rectangle Selection tool.
Part 5: Speed Up Your Workflow with Function Key Shortcuts
For maximum efficiency, use the F-keys on your keyboard to instantly activate a digitizing tool with a specific stitch type already selected.
| Shortcut | Action | Tool Used |
| F2 | Creates Manual Stitches. | Outline |
| F3 | Creates Running Stitch. | Outline |
| F4 | Creates Satin objects. | Pair-point |
| Shift + F4 | Creates Satin objects. | Outline |
| F5 | Creates Step objects. | Outline |
| F6 | Creates Zig-Zag objects. | Pair-point |
| Shift + F6 | Creates Zig-Zag objects. | Outline |
| F7 | Creates Satin Serial objects. | Outline |
| F8 | Creates Piping objects. | Pair-point |
| Shift + F8 | Creates Piping ojects. | Outline |
eXPerience Facebook Page
Happy crafting and don’t forget to share your creations with us in the
eXPerience Facebook Page!