How to Use the Pair-point Digitize Tool
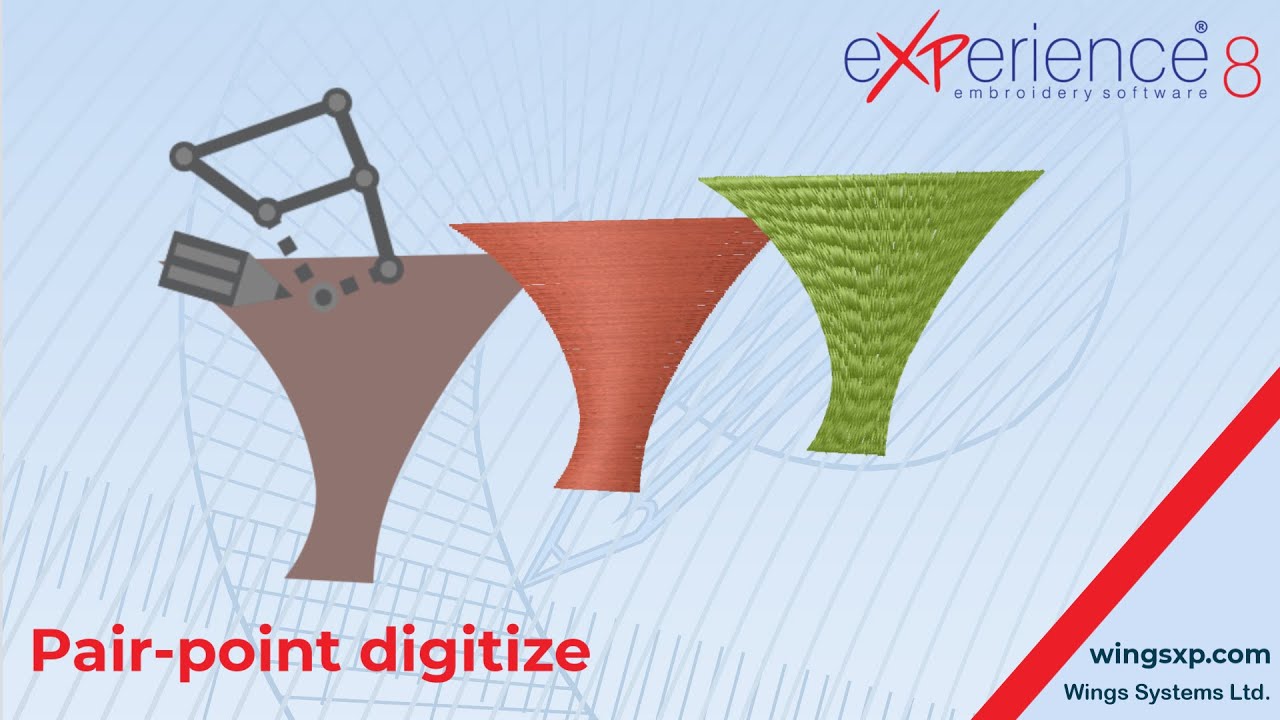
The Pair-point Digitize tool is a specialized function within eXPerience 8, ideal for creating complex or irregular shapes with perfect stitch direction control. Its primary strength lies in creating high-quality Satin and Piping stitch objects.
Unlike other digitizing tools where you trace an outline, this tool works by placing nodes in pairs. Each pair defines the two opposite edges of a column, simultaneously setting the stitch direction for that segment. This makes it perfect for organic shapes like stems, leaves, or lettering where you want the stitches to flow naturally with the shape.
Step 1: Accessing and Enabling the Tool
The Pair-point Digitize tool is context-sensitive and only becomes active when an appropriate stitch type is selected.
- Locate the Digitize tools on the main Tools bar.
- The Pair-point Digitize tool icon may be visible. If not, click and hold the currently visible digitize tool icon to reveal the list of available tools, and select Pair-point Digitize.
- Important: You will notice the tool is disabled (grayed out) by default. This is because it can only be used to create Satin or Piping objects.
- From the Stitch Type panel, select Satin. The Pair-point Digitize tool icon will now become enabled and ready to use.
Step 2: Digitizing a Basic Shape
With the tool active, you can begin creating your shape by defining it with pairs of points.
- Left-click on one side of your desired shape to place the first node.
- Move your cursor to the opposite side and left-click again to place the second node. This completes your first pair.
- This pair of nodes defines both the width of the satin column at that point and the direction of the stitches that will fill it.
- Continue moving along your shape, adding subsequent pairs of nodes to define its path and width. The software will automatically generate the satin-filled area between the pairs.
Useful Tip: By default, all points are connected with a smooth curve. For more precise control over the curve as you place a point, you can click-and-drag to adjust the curve’s shape in real-time.
Step 3: Creating Corners and Correcting Mistakes
You have several shortcuts available while digitizing to improve your workflow and accuracy.
- To Create a Sharp Corner: Hold down the SHIFT key while you place a node. That point will become a sharp corner instead of a smooth curve.
- To Delete the Last Point: If you make a mistake, simply press the BACKSPACE key. This will remove the last node you placed, allowing you to easily correct your path without starting over.
Step 4: Creating Multi-Section Objects
The Pair-point tool is excellent for creating a single object composed of several separate parts (like the individual stems of a flower that should all be embroidered together).
- After you finish digitizing the first section, right-click once.
- This finalizes the section but keeps the tool active.
- You can now move to a new area and begin digitizing the next section.
- Continue this process for as many sections as you need. All sections will belong to the same object in the sequence list.
Step 5: Finalizing Your Work
Finalizing tells the software you are finished creating sections for the current object. You can use either mouse clicks or keyboard shortcuts.
- To Finalize a SECTION (and continue creating more sections for the same object):
- Right-click once OR
- Press Enter or Esc once.
- To Finalize the entire OBJECT (and stop adding sections):
- Right-click twice OR
- Press Enter or Esc twice.
- To Release the Tool: Once an object is finalized, the tool remains active for creating a new, separate object. To release it completely, you can right-click one more time, press Enter or Esc again, or simply click the Rectangle Selection tool.
Additional Tips
- Stitch Flow: Remember that the power of this tool is controlling stitch direction. As you place your pairs, you are actively guiding the flow of the stitches. You can edit the direction lines later to see how it dynamically changes the stitch pattern.
- Snapping to Grid: For precise, geometric shapes, you can enable the grid and the Snap to Grid function. While digitizing, your cursor will lock onto the grid points. To temporarily disable snapping for a single point, hold down the ALT key.
eXPerience Facebook Page
Happy crafting and don’t forget to share your creations with us in the
eXPerience Facebook Page!