Transform Your Designs: Add Text to Your Embroidery Projects (Updated)
Adding and customizing text is an essential part of creating unique embroidery designs. This guide will walk you through everything you need to know about using the Text tool in eXPerience 8, from basic typing to advanced character manipulation.
1. Getting Started: Accessing the Tool and Setting Defaults
Before you begin typing, it is helpful to set up your preferred stitch parameters and colors.
- Locate the Text Tool: Navigate to the toolbar on the left side of the application window. Hover over the Lettering section to reveal two options: Text and Monogramming. Select Text.
- Select a Stitch Type: Choose the stitch type for your text. By default, new designs use a Satin stitch.
- Select a Color: Click on any available color from your color palette to apply it to the new text part.
💡 Tip: If you have previously used an alternative stitch type during your current session, the software will automatically apply your last used stitch type to the new text. Always check your Properties panel to verify the active stitch type before starting.
2. Adding and Editing Text in the Design Area
The text editor in eXPerience 8 functions similarly to standard word processors.
- Place the Starting Point: Click anywhere in the design area to define the position of your text. A blinking cursor will appear.
- Type Your Text: Begin typing. By default, the text will appear on a single, continuous line.
- Add Line Breaks: Press Enter (or Return) on your keyboard to start a new line of text.
- Edit Errors: Use the Backspace key to delete characters to the left of your cursor, and the Delete key to remove characters to the right.
- Navigate: Use the arrow keys on your keyboard to move the cursor through the text.
💡 Tip: If you click the wrong spot in the design area, simply click again somewhere else to replace the starting point before you begin typing.
3. Choosing Fonts and Formatting Options
All parameters regarding your text’s appearance are located on the top options toolbar.
- Open the Font Selector: Click on the current font name to open the dropdown menu. You can scroll through the list or search for a specific font by typing its name.
- Understand Font Types: eXPerience 8 features three distinct font categories, which you can quickly jump to by clicking their respective icons:
- Pre-digitized Fonts (Zig-Zag Icon): High-quality lettering made by professional digitizers (over 200 included).
- True Type Fonts (TT Icon): Standard fonts installed locally on your computer.
- Symbol Fonts (S Icon): Fonts consisting of shapes and symbols.
- Adjust Size: Type a value into the size box or scroll with your mouse wheel. This value represents the exact height of the characters.
- Apply Styles: Toggle Bold or Italic formatting where applicable.
💡 Tip for Previewing Fonts: After selecting a font from the dropdown, do not click anywhere else. While the dropdown is still in focus, use the Up and Down arrow keys on your keyboard to cycle through the list. Your text on the design area will automatically update, allowing you to rapidly preview different fonts. (Note: Some styles, like italics, may be disabled for pre-digitized fonts).
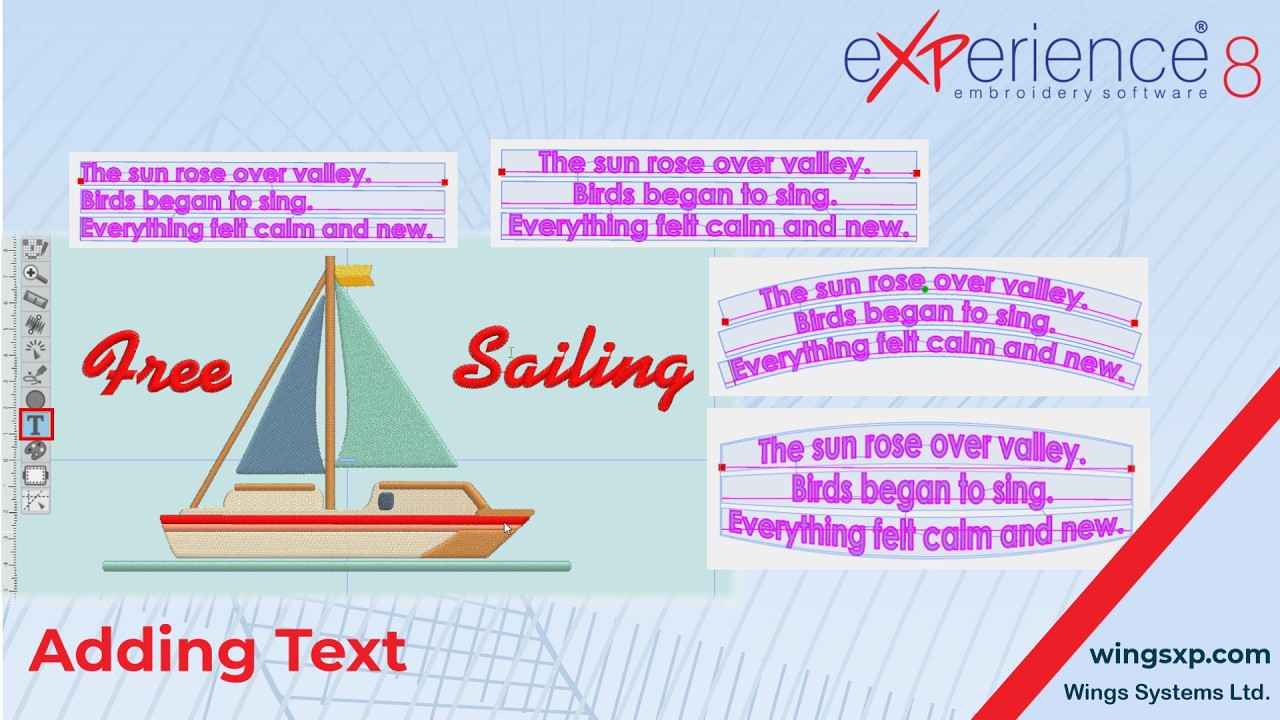
4. Adjusting Spacing and Orientation
Fine-tune the layout of your words and letters using the spacing and placement settings.
- Character Spacing: Type a value into the Horizontal spacing field to adjust the distance between individual letters.
- Line Spacing: For multi-line text, adjust the Vertical spacing value to change the distance between lines.
- Text Boundaries & Orientation: Switch your text orientation to control how it wraps. For example, if you switch to an On-line segment, the length of that line becomes a strict boundary. If your typing exceeds that line length, the software will automatically move the cursor to a new line without you needing to press Enter.
- Advanced Placements: You can also place text On-Arc or On Custom Path for creative layouts, or use the Envelope feature to warp and transform the text shape.
5. Finalizing and Re-Editing Text Objects
Understanding how the software handles active text vs. finalized objects is crucial for a smooth workflow.
- Finalize the Text: When you are finished typing and formatting, click the Rectangle Selection tool. The text is now finalized as an object.
- Re-Edit the Text: If you select the finalized text block with the standard selection tool, you will only see Dimension options, not text options. To change the font, spelling, or spacing, you must select the Text Tool again.
- Release the Tool: Once your edits are complete, click the standard selection tool to release the Text tool.
6. Moving and Positioning Text
You have multiple ways to move your text depending on the level of precision you need.
- Move the Entire Object: Hover your mouse over the highlighted boundary area around the text (do not hover directly over the letters). The cursor will turn into a Hand icon. Click and drag to move the entire block.
- Move Individual Characters (Placement Handles): Look for the small dots at the center of each letter. Hover over a dot, then click and drag to move that specific character for a unique layout.
- Move Multiple Characters (Node Editor): Open the Node Editor. You will see the center dots on each character. In this mode, you can select multiple characters at once and drag them together.
7. Breaking Text Apart for Ultimate Customization
Sometimes you need to treat letters as individual pieces of art rather than a cohesive text block.
- Break Apart: Right-click the text object and select Break Apart.
- First use (on a paragraph): Separates the text into individual Lines.
- Second use (on a line): Separates the line into individual Words.
- Third use (on a word): Separates the word into individual Letters.
- Edit Individually: Once broken down to the letter level, each character is a separate object. (Note: You can no longer edit the spelling or use the Text options toolbar for these items. Use Undo if you need to revert).
- Convert to Curves: To freely edit the physical shape and stitches of a single letter, select it and use the Convert to Curves option. You can now use the Node Editor to manipulate the raw artwork exactly as you would with any other digitized shape in your design.
eXPerience Facebook Page
Happy crafting and don’t forget to share your creations with us in the
eXPerience Facebook Page!