How to Use the Stippling Fill Type in eXPerience 8
The Stippling fill type is a highly versatile tool in eXPerience 8, primarily used to create intricate decorative netting or to securely hold different quilt layers together.
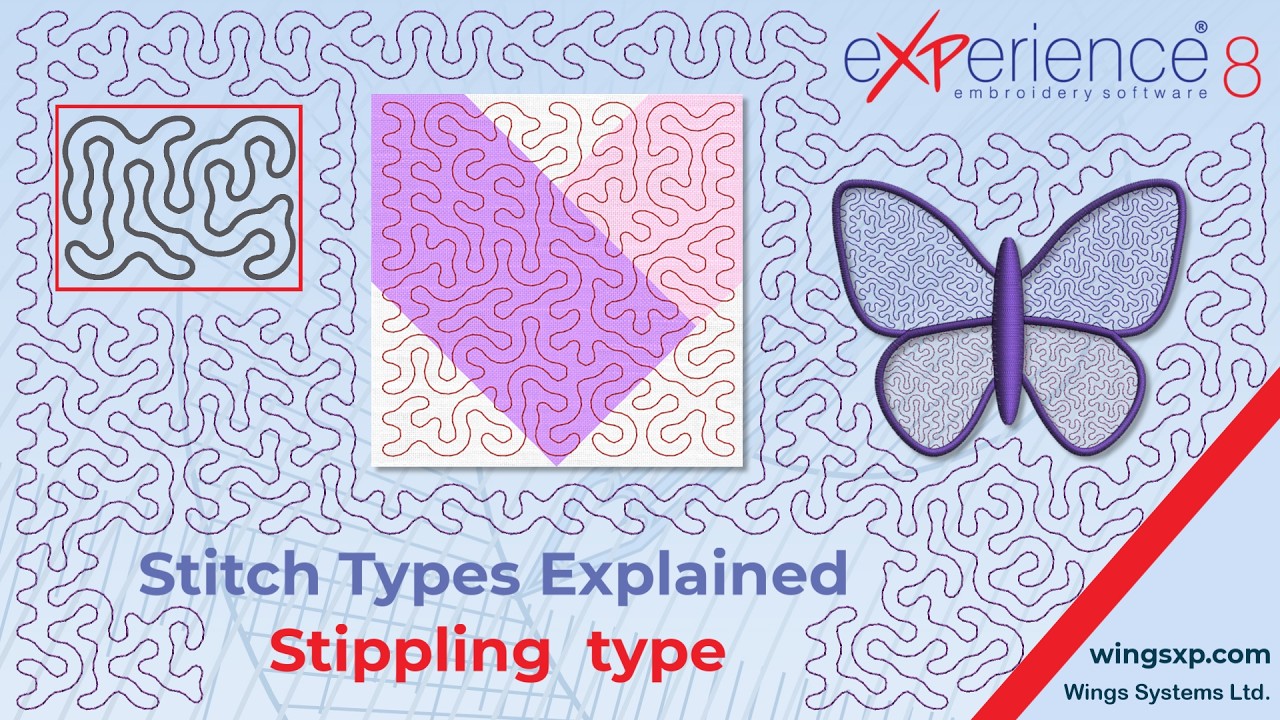
Here is your complete guide to applying, customizing, and manually editing stippling fills in your embroidery designs.
Applying a Stippling Fill
You can generate a stippling pattern either by applying it to an existing design or by drawing a completely new shape.
Method A: Applying to an existing object
1.Select your object:
Click on the ready-made shape or object you want to fill in your workspace.
2.Set the fill type:
Navigate to your properties and set the fill type to Stippling. The software will automatically generate the pattern and fill the object.
Method B: Digitizing a new shape
1.Select the Stippling tool:
Choose Stippling directly from the Embroidery Properties before drawing.
2.Digitize the shape:
Draw your new shape on the workspace. The stippling pattern will fill the shape dynamically as you close the path.
Dividing Shapes with the Knife Tool
You are not locked into your original shapes. You can easily cut and modify a stippled object using the Knife tool.
Pro Tip: When you slice an object with the Knife tool, eXPerience 8 automatically recalculates and regenerates the stippling pattern so that it perfectly conforms to the boundaries of your newly divided shapes.
Customizing Stippling Options
You can fine-tune the look and behavior of your stippling pattern using the Embroidery Properties panel:
- Density: Controls the spacing. Adjust this to change the distance between the lines of the stippling pattern.
- Length: Defines the maximum distance between needle penetration points.
- Stitch Style: You can decorate the basic stippling lines by applying any available style of stitches. (To remove an applied style, simply press the x).
- Offset: Shifts the entire stippling fill to the inside or outside of the object boundary.
Pro Tip — Optimizing Stitch Length: If you zoom in and use the Measuring tool, you may notice the actual stitch length is sometimes shorter than your setting. Because the stippling pattern constantly turns, eXPerience 8 intelligently reduces the stitch length on curves to perfectly follow the pattern without creating jagged edges.
Pro Tip — Using Offset for Pull Compensation: Set the offset slightly larger (outside the shape) to allow for the natural pull of the embroidery on the fabric. Conversely, set it smaller (inside the shape) if you need to guarantee the stippling pattern stays strictly within a specific boundary.
Advanced Editing: Break Apart and Node Editor
If you need absolute, manual control over the exact path of the stippling lines:
- Select your stippled object.
- Apply the Break apart function. This strips away the automatic fill properties and converts the pattern into standard, freely editable line patterns.
- You can now break the pattern into sub-parts and precisely adjust the path using the Node editor.
Managing Securing Stitches (Fixing & Locking)
Finally, you can dictate exactly how securing stitches are added at the start (Fixing) and end (Locking) of your stippling pattern.
| Setting | Behavior |
| Auto (Default) | The software intelligently decides if fixing/locking stitches are technically necessary based on the object type, stitch density, and overall sequence. |
| Always | Securing stitches will inevitably be added at the start/end of the object, regardless of surrounding elements. |
| Never | No securing stitches will be added, which forces a soft start/end. |
eXPerience Facebook Page
Happy crafting and don’t forget to share your creations with us in the
eXPerience Facebook Page!